Sussy link write up.
Printed From: rsvr.net Forums
Category: RSV / RSVR / FACTORY
Forum Name: 'How To Guides'
Forum Description: A compilation of guides and advice from forum members
URL: http://www.rsvr.net/forum_posts.asp?TID=9841
Printed Date: 27 Mar 2026 at 00:39
Software Version: Web Wiz Forums 12.07 - https://www.webwizforums.com
Topic: Sussy link write up.
Posted By: Wavestarved
Subject: Sussy link write up.
Date Posted: 18 Apr 2013 at 07:05
|
So here goes... Thanks very much to Tapmyhead and anyone else for their advice and help with doing this job, it is an easy one but always good to get some sound support. Order some new bearings, you'll need 6 x HK 1812 and 6 x nitrile rubber seals 24/18/3 When they arrive... Get the bike up on something supporting it through the swing arm pivot. I made a sh*t version of an abba stand with some off cuts of box section steel I had lying around. http://s150.photobucket.com/user/MintoMonkeyMan/media/170420131344.jpg.html" rel="nofollow"> 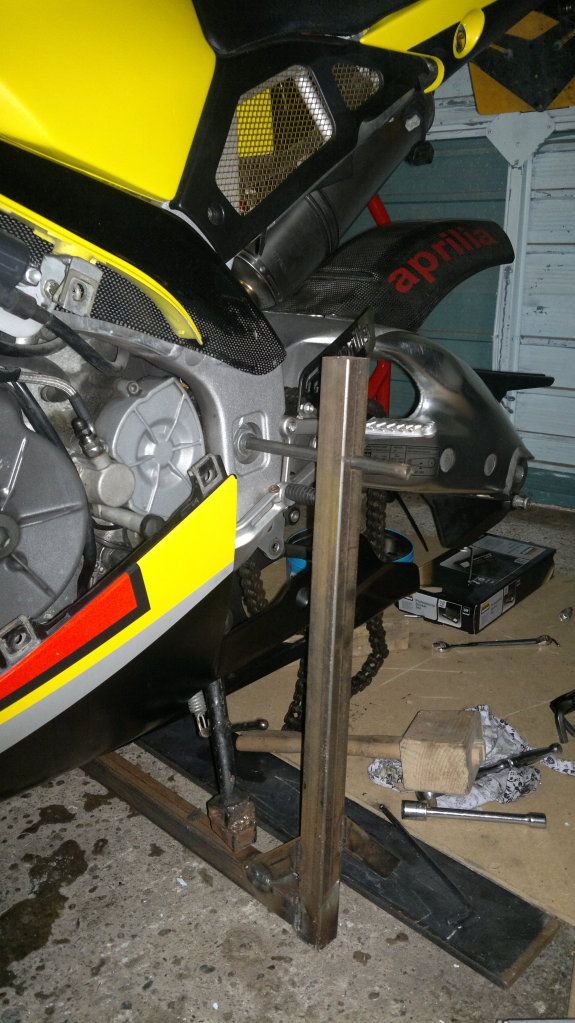 Get the rear wheel off and put somewhere safe, you'll be needing that later. Undo the rear part of the belly pan (or remove it completely if you have more patience than me) to get a bit of access to the linkage, one alen bolt on the left, 3 on the right. This will allow it to drop a couple of inches. With a 13 mm spanner and a 15 mm socket and ratchet, undo the bolts that hold the linkage in place. As Si600 pointed out to me, if you loosen them all first, leaving the bolts in it stops the plates flapping about and getting in the way of more spannering, good call Si. http://s150.photobucket.com/user/MintoMonkeyMan/media/image-5.jpg.html" rel="nofollow"> 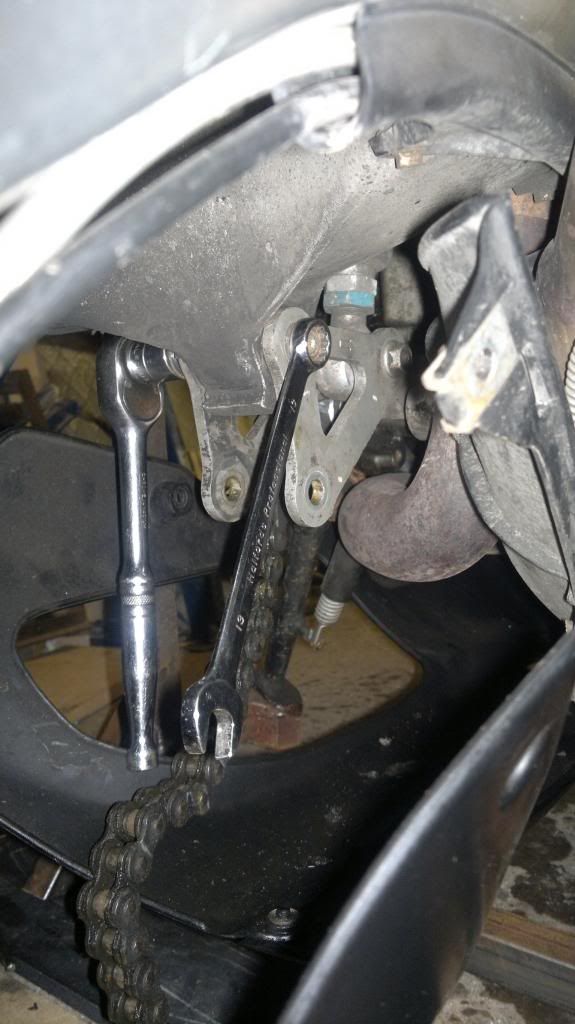 Withdraw all the bolts including those holding the dogbone to the frame and the plates to the swing arm. http://s150.photobucket.com/user/MintoMonkeyMan/media/image-4.jpg.html" rel="nofollow"> 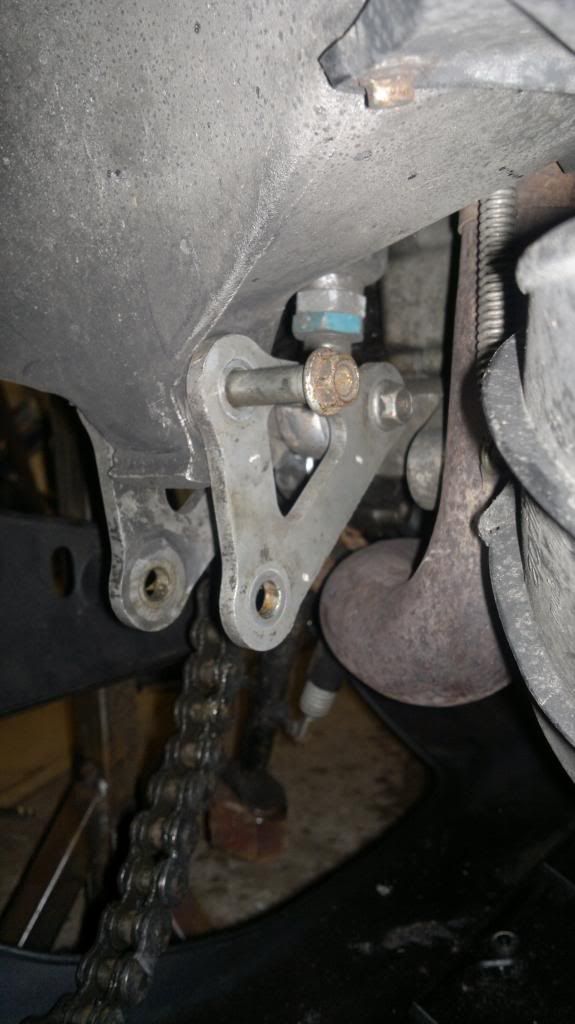 I left my plates and shock mount bolt in situ as I'd only had them out a few weeks back to inspect them. But do give them a look over! Any damage, replace them. Take the dogbone out, remove the bearing pin, put to one side and then pry out the seals with a screwdriver, mine came out easily, also remove the bearing pin and take the seals from the swing arm now exposing the bearings. http://s150.photobucket.com/user/MintoMonkeyMan/media/image-3.jpg.html" rel="nofollow"> 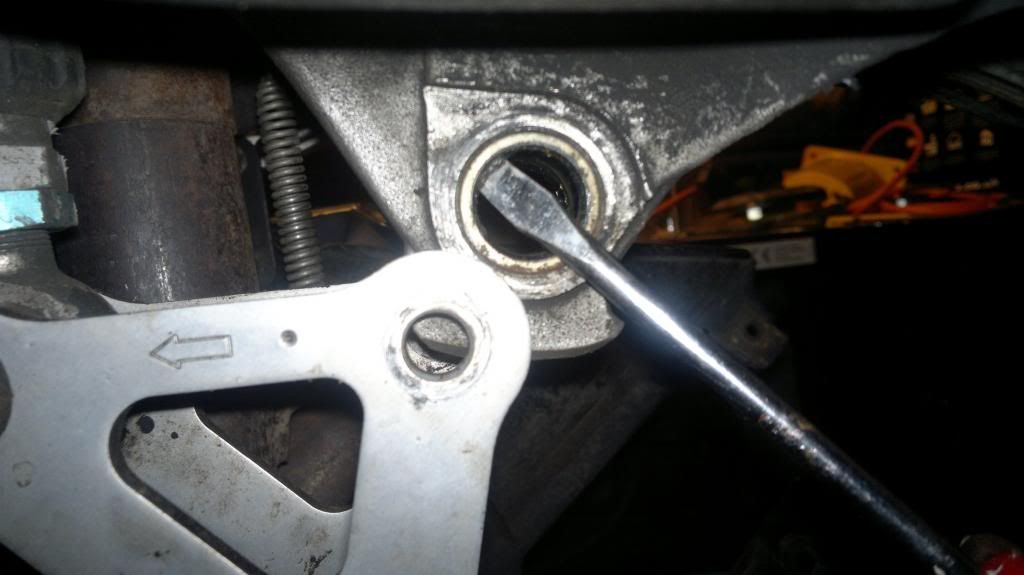 Place the dogbone in a vice (or bigG clamp if you don't have a vice) with a 1" socket on one side of the dogbone, being careful to centre this properly as you'll be pushing the bearings out into this socket. Also place an 11/16" socket against the bearing, start winding the vice up to press out the bearings. http://s150.photobucket.com/user/MintoMonkeyMan/media/image.jpg.html" rel="nofollow"> 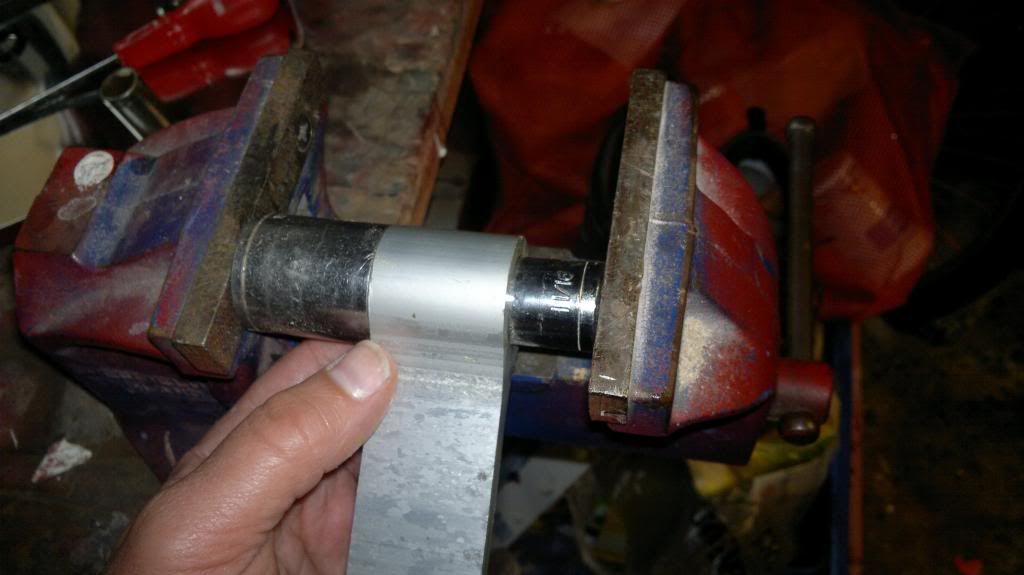 To get the bearings out of the swing arm linkage point, put the 11/16" socket on a an extension bar and place it against the exposed bearing, and start driving it out by twatting the bar with a mallet... Persuasive taps was what was needed for mine. http://s150.photobucket.com/user/MintoMonkeyMan/media/image-8.jpg.html" rel="nofollow"> 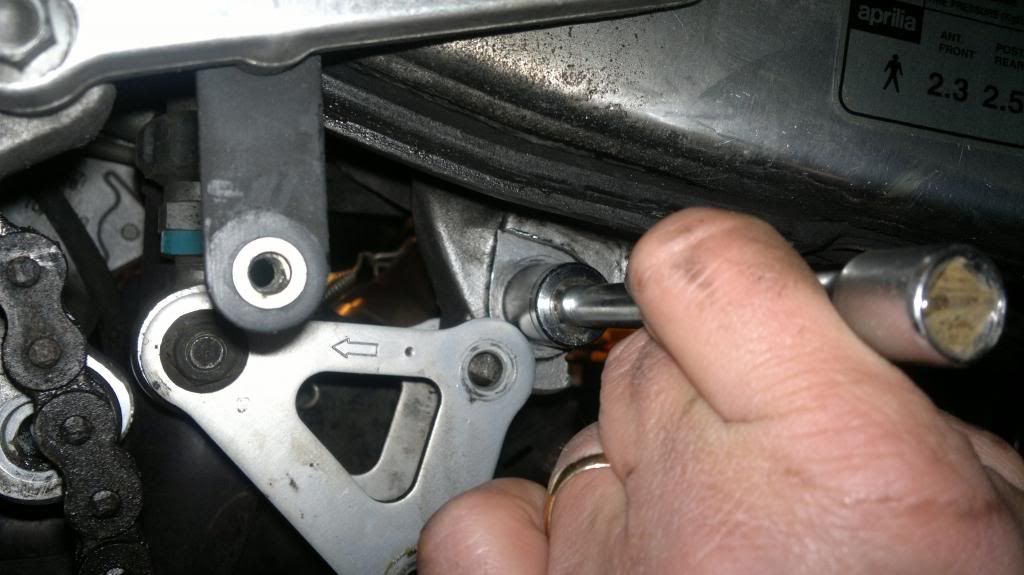 Once the bearings are out of the swing arm and dog bone, get it all cleaned up ready to put your new bearings in. http://s150.photobucket.com/user/MintoMonkeyMan/media/image-1.jpg.html" rel="nofollow"> 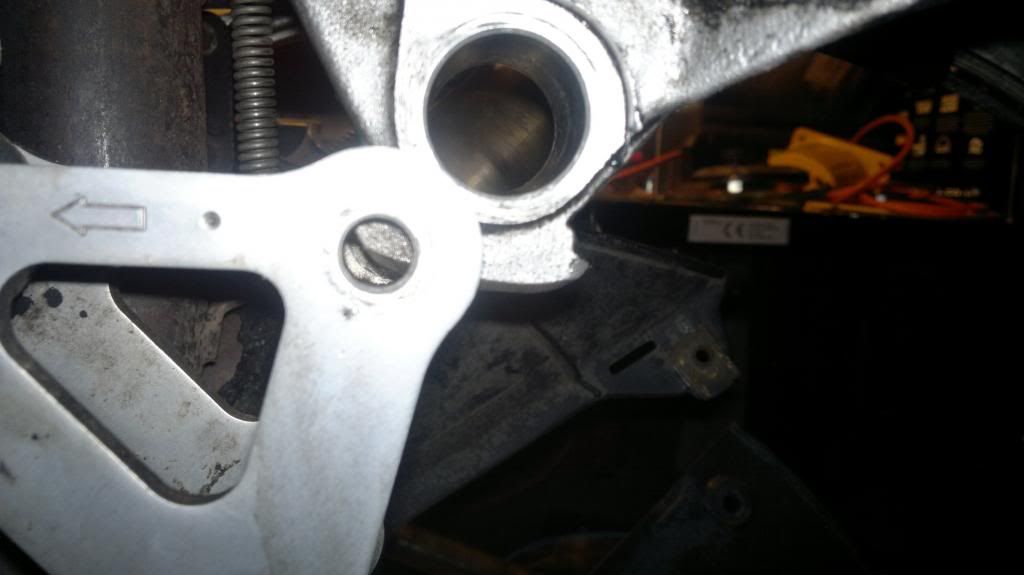 For the swing arm, press them in the same way as you got em out, put the first set in from the left side of the bike as you have better access (unless you have a 2-2 exhaust, ha ha) drive the first set in until they are about 4mm from flush on the other side then push the second set in so that they are about 4mm below flush on the left side http://s150.photobucket.com/user/MintoMonkeyMan/media/image-10.jpg.html" rel="nofollow"> 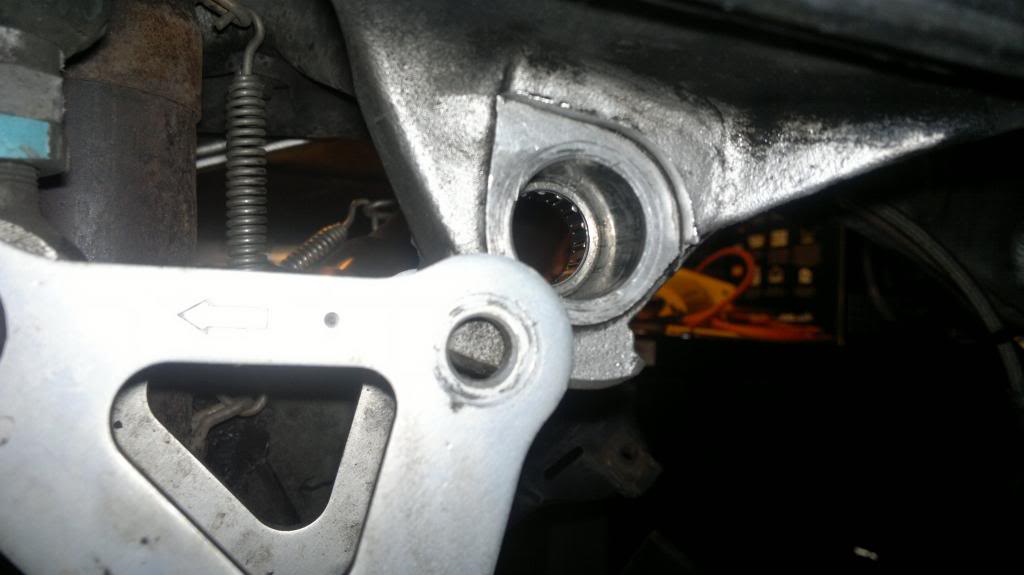 http://s150.photobucket.com/user/MintoMonkeyMan/media/image-9.jpg.html" rel="nofollow"> 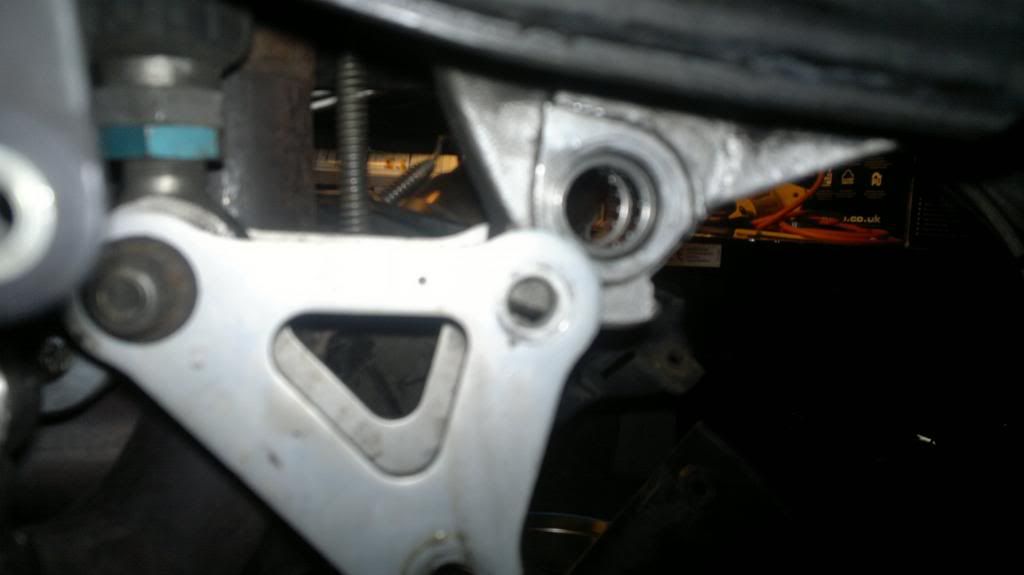 For the dog bone, press the bearings in with the vice and 11/16" socket, again leave them 4mm from flush. http://s150.photobucket.com/user/MintoMonkeyMan/media/image-13.jpg.html" rel="nofollow"> 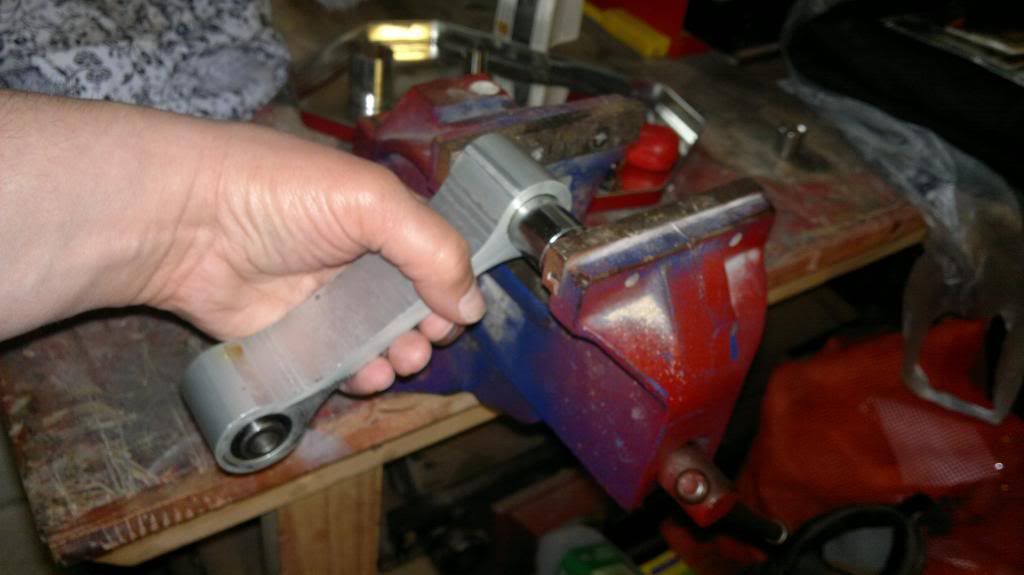 Then push your nice new seals into place over the bearings http://s150.photobucket.com/user/MintoMonkeyMan/media/image-6.jpg.html" rel="nofollow"> 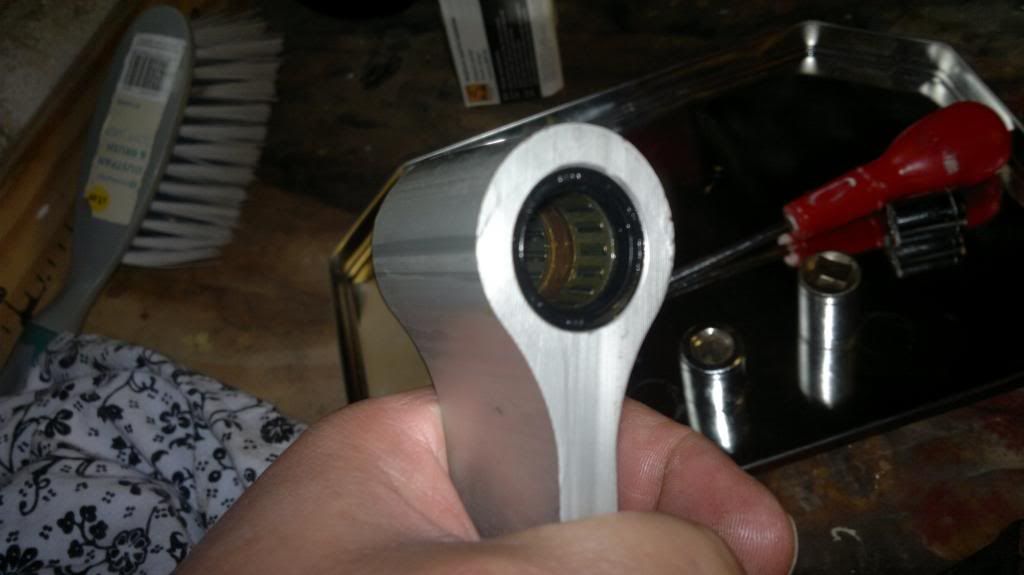 Also do the new seals on the swing arm. Slap loads of grease in there, The legend that is Tapmyhead, recommends marine grade trailer wheel grease as it won't wash out. In order to stop the dogbone and plates interfering with each other, some Teflon or nylon washers can be used on reassembly, these will need to have an 18mm hole so that it sits around the bearing pin. Now you have the bearings and seals replaced put it all back together in the reverse order you took it apart, torque the 15mm nuts on the linkage components to 50nm. Now, where the hell did I put that back wheel? Don't forget to properly tension that chain and align the rear wheel properly, most important on these things. Please feel free to add any bits I've forgotten or correct any mistakes but please be gentle about the state of my garage. Yes Davesurfer, you! |
Replies:
Posted By: davidrsurfer
Date Posted: 18 Apr 2013 at 07:19
| You have now stepped into the ring so stand by for some major piss take over the state of your garage, tools, work methods & anything else people can spot! Good luck I wish you well! btw thought this was going to be 12legs stocking themed post. Damn. |
Posted By: Si600
Date Posted: 18 Apr 2013 at 08:06
Nice write up.  Have you already removed the dogbone in the second picture? How hard is it to get to the back of the gearbox to undo the bolt? Not wishing to worry you, but picture 6 looks like part of the swingarm pivot has snapped off!
 |
Posted By: davidrsurfer
Date Posted: 18 Apr 2013 at 08:14
| Fair go feller. Good write up & pics. On Gen2 I ended up taking the exhaust collector off so I could get the front pivot bolt out. |
Posted By: Wavestarved
Date Posted: 18 Apr 2013 at 08:16
Jeesis krises I bloody hope not! I'm pretty sure that's just how it's cast, but I will check. It's pretty easy to get to the dogbone bolts once you've dropped the belly pan, do all the work from the left side as you have more room. 15mm socket and a long Allen key for this bolt. Easy enough. |
 Si600 wrote:
Posted By: Wavestarved
Date Posted: 18 Apr 2013 at 08:19
Cheers bud, I thought about removing the exhaust but it seemed like extra work for very little benefit on the gen 1. Can't believe you didn't mention the state of my chain/swing arm/chain runner etc. lol. |
Posted By: Wavestarved
Date Posted: 18 Apr 2013 at 08:24
|
Si600, Phew, just looked at pics 2 and 3, definitely just part of the casting. Had me worried there mate. |
Posted By: Si600
Date Posted: 18 Apr 2013 at 08:34
|
Sorry about that! It didn't look a very healthy edge but if it's made that way then all is well.
Did you drive both bearing shells out and in from the same side of the swingarm? Just keep going until they fall out I suppose.
|
Posted By: Wavestarved
Date Posted: 18 Apr 2013 at 18:48
Exactly that, they came out much easier than I expected. I thought I'd probably have to knock together some kind of draw bolt or something but no, a couple of dozen fairly firm smacks with a mallet and they're on the floor. Happy days! |
Posted By: pieman
Date Posted: 21 Apr 2013 at 10:25
|
great writeup ------------- One day Rodney, We'll be Mille Owners |
Posted By: Wavestarved
Date Posted: 21 Apr 2013 at 10:31
|
Cheers mate, enjoyed doing it.
|
Posted By: rossie
Date Posted: 21 Apr 2013 at 22:31
|
Very nice explanation, dude. Did exactly the same on mine. Only mine's black, of course.
When the linkage was out, I checked for the minimal chain clearance. Something nice to forget about later on, I suppose. but it's pretty important as you can cause lots of damage with a too tight chain. I also thought about putting in grease nipples while I was there. The space between the pairs of bearings looked pretty welcome to me, so maybe next time... |
Posted By: Wavestarved
Date Posted: 21 Apr 2013 at 23:12
|
I also thought about nipples, quite a lot actually...lol. Wasn't sure whether it would weaken the bone though, fnar! besides straight forward enough to dismantle so wont bother. What do you mean by minimal chain clearance? Are you just referring to chain tension? Or is there sumat I missed? |
Posted By: rossie
Date Posted: 21 Apr 2013 at 23:22
|
No, no fussy stuf, just chain tension. The chain tensions if the bike sinks in to it's rear suspension. Output shaft bearings often get f**ked this way, but for good gearshifting you'd want the least chain slack. Nipples will never weaken bones.
|
Posted By: tapmyhed
Date Posted: 22 Apr 2013 at 00:25
|
spot on mate, nice job, but what's going on with that chain??? ------------- Factory 04 Big Bore Whore |
Posted By: Wavestarved
Date Posted: 22 Apr 2013 at 06:32
| Cheers Taps, I can't believe you're the first person to mention my chain, it's a goddamn mess init! Gonna get a new one on it when funds allow, it's still on standard sprockets so I reckon it might well be the chain and cogs it came with from new. Cleaning it up for now, the crap on the chain runner was literally 1/2 " thick. |
Posted By: tapmyhed
Date Posted: 22 Apr 2013 at 07:24
|
yup that cack gets everywhere...shame it doesn't stay on the chain. I spray on then wipe off, and do it after a ride so it has plenty of time to lose the carrier agent. ------------- Factory 04 Big Bore Whore |
Posted By: snowman
Date Posted: 22 Apr 2013 at 07:32
| With suspension links done and new chain and sprockets its gonna feel so different esp if you change gearing |
Posted By: bigbrownepaul
Date Posted: 22 Apr 2013 at 09:03
Gearing is a must 16/44 on mine, great write up thanks a lot, mine getting done shortly.... ------------- No bike 🙈 www.apriliaperformance.co.uk www.apriliaforum.co.uk www.apriliaownersclub.co.uk |
Posted By: Wavestarved
Date Posted: 22 Apr 2013 at 19:47
Aye that's what I'm going with I think. Cheers fella. |
Posted By: Wavestarved
Date Posted: 22 Apr 2013 at 19:48
I'm hoping so, changing the ratio to 16/44 I think |
Posted By: wigginsjp
Date Posted: 23 Apr 2013 at 14:05
|
Did Mine. Probably the most painful experience ever! Glad it's back in one piece no though. Managed it with a paddock stand, some axle stands, a 12mm steel bar, and a trolley jack. Oh and one hell of a lot of swearing! Some small scratches on the dog bone and the plates. Nylon washers in and bearings greased. Although one of the washers is already showing a bit of wear from the plate (one on swingarm). Beautiful day today but no time to ride. Fingers crossed for tomorrow!
|
Posted By: Wavestarved
Date Posted: 23 Apr 2013 at 18:38
| Hardest part for me was the balancing act of chain tensioning and wheel alignment, only difficult cos when it's on the paddock stand you can barely get to the adjuster bolts. Pita! |
Posted By: K3FatBoy
Date Posted: 25 Apr 2013 at 15:05
|
Nice write-up chap. Question: what prompted you to do it? Miles, fear, or you could feel some slop somehow? Or had you just been in to get a bit of grease on, and found 'em dry and horrible? (I've got coming up for 25k on mine, and I'm getting paranoid - I ride all year round, and I last greased them 2 years ago)
|
Posted By: Wavestarved
Date Posted: 25 Apr 2013 at 18:05
|
Cheers fella Did mine after reading some orrible orror stories about it all falling apart and going proper wrong. I knew it wouldn't be a difficult job as I'd already had it apart when I first had the bike, as the guy I bought it from had fitted some lowering kit plates which I felt affected the handling so I put the original ones back on which was a doddle. Yeah mate, for the cost and ease of the job, I'd get em done. Peace of mind an all that. |
Posted By: pieman
Date Posted: 13 May 2013 at 20:03
|
I've had time to get mine out again this afternoon, thought I'd better as its been a year and Nooj has cleaned my bike twice in that time and probably washed all the grease out... after just slapping a load of grease in last time, 2 sets have now turned the grease into grinding paste, the one in the swingarm actually seems okay though. All the pins have got some notching from the rollers. On the upside the slight rubbing on the dogbone and sideplates hasn't got any worse (58k miles now) but I've decided to replace all the bearings and seals and get 3 new pins from Aprilia and put nylon washers on. http://www.apriliayorkshire.co.uk/catalogue/inspect.jsp?stockid=116036" rel="nofollow - http://www.apriliayorkshire.co.uk/catalogue/inspect.jsp?stockid=116036 http://simplybearings.co.uk/shop/p555324/HK1812+Budget+Drawn+Cup+Type+Needle+Roller+Bearing+Open+End+Type+18x24x12mm/product_info.html" rel="nofollow - http://simplybearings.co.uk/shop/p555324/HK1812+Budget+Drawn+Cup+Type+Needle+Roller+Bearing+Open+End+Type+18x24x12mm/product_info.html http://simplybearings.co.uk/shop/p28181/18x24x3mm+Nitrile+Rubber+Metric+Oil+Seal+Type+R21+/+SC+Style/product_info.html" rel="nofollow - http://simplybearings.co.uk/shop/p28181/18x24x3mm+Nitrile+Rubber+Metric+Oil+Seal+Type+R21+/+SC+Style/product_info.html £68 all told plus a couple of quid for some plastic washers from b&q Incidentally I didn't feel the need to remove my rear wheel (I have an abba stand btw and yours is good for a quick job), just put a block of wood under it to stop it from dropping out of place unless I need to drop it down to get the bearing out, but I did completely remove the bottom fairing as it only takes seconds and gives you a lot more space. One day I'll actually ride my bike!! ------------- One day Rodney, We'll be Mille Owners |
Posted By: Si600
Date Posted: 13 May 2013 at 20:32
| What are the differences between the three HK1812 bearings on the list? Apart from cost! |
Posted By: pieman
Date Posted: 13 May 2013 at 20:49
|
I looked at the tech specs on each and the top 2 are the same, the bottom one has no picture or specs, so I figured to go with the cheapest and see how long they last!! ------------- One day Rodney, We'll be Mille Owners |
Posted By: Stonesie
Date Posted: 13 May 2013 at 20:49
|
http://simplybearings.co.uk/shop/advanced_search_result.php?sort=2a&search_in_description=0&keywords=hk1812&x=-287&y=-214&categories_id_src=4578&inc_subcat=1" rel="nofollow - http://simplybearings.co.uk/shop/advanced_search_result.php?sort=2a&search_in_description=0&keywords=hk1812&x=-287&y=-214&categories_id_src=4578&inc_subcat=1 The most expensive one is a 'Full Compliment' bearing, it has no plastic cage to hold the rollers in because they've got it chock full of as many rollers as possible, this is what Aprilia use at the factory but people are using the normal type with no problems, just inspect and re-grease them every year.
|
Posted By: SPOOKY
Date Posted: 13 May 2013 at 22:23
Si the bottom one, the full complement is the exact same Torrington bearing that Aprilia use. It hasn't been readily available on the general market until recently. Laters SPOOKY ------------- www.apriliaperformance.co.uk www.apriliaforum.co.uk www.apriliaownersclub.co.uk |
Posted By: Si600
Date Posted: 13 May 2013 at 22:27
| Is it worth getting the full complement ones or will either of the other ones do? |
Posted By: SPOOKY
Date Posted: 13 May 2013 at 22:44
I personally wouldn't go for the cheapo ones but I've ran the named bearing in mine for nearly 3 years without any problems. I had both bearing in my hand a couple of weeks ago at Simply Bearings and there is a marked difference between budget and named. If you think how little movement goes through these bearing there's plenty of support from the caged ones. One last thing though, and it's been said before, don't use the Aprilia dust seal they are sh*te and have a very little lip to seal on the piston pin hence why water and crap find their way past and into the bearing. Use a Nitrile R21 / SC seal 18 x 24 x 3. Laters SPOOKY
------------- www.apriliaperformance.co.uk www.apriliaforum.co.uk www.apriliaownersclub.co.uk |
Posted By: pieman
Date Posted: 13 May 2013 at 23:29
|
31 rollers in the aprilia bearings I just took out. Thanks for clearing that up. ------------- One day Rodney, We'll be Mille Owners |
Posted By: pieman
Date Posted: 16 May 2013 at 21:36
|
grrr, the first bearing in the dogbone came out easy using the vice. Second one would not budge. Tried heating it, hitting it with a big hammer, nothing. Took it to work with the intention that I would stop off at an industrial estate on the way home and see if anyone could help. At work I was on the phone to the engineering supervisor................. Then I remembered, we have a large engineering department at the garage I just moved to, there was no facilities at my old garage!! The new one is a major facility, they do repairs, mot's and overhauls on buses, so I took it down there and sorted. Now the only one left to take out is the one attached to the bike. This one looks in the best condition of all the bearings I took out, but I'm not sure this will be so easy to sort if I start it then get stuck half way!!!! Wish me luck!! It needs to come out as I'm sure there's play that doesn't need to be there and I know my suspension will feel better when I've replaced them all even if it's just a placebo effect. Needless to say I think I will need to take the back wheel off too just to move the chain out of the way and give better access. Incidentally, a bit of threaded rod the right size and some washers and nuts added to the sockets should make quite a nice extractor for use in a situation like this if it doesn't want to budge- apparently...... ------------- One day Rodney, We'll be Mille Owners |
Posted By: Wavestarved
Date Posted: 17 May 2013 at 06:38
| Good luck pm, hopefully you'll get less hassle from this one. |
Posted By: Wavestarved
Date Posted: 29 Jun 2013 at 22:24
| Bump for TinMan |
Posted By: Si600
Date Posted: 06 Jul 2013 at 09:21
|
Are the bearing and seal sizes quoted at the top of this post good for Gen2 bikes as well? Also, I have a exhaust pipe in front of the lower dogbone bolt, is it easy to move by loosening or does the whole exhaust have to come off? No wonder these things don't get looked at
|
Posted By: davidrsurfer
Date Posted: 06 Jul 2013 at 09:32
| Not sure about the bearing sizes but I ended up taking the collector & front downpipe off to get that bleedin bolt out. I think somebody on here reversed it to make it easier next time. |
Posted By: apriliano
Date Posted: 29 Apr 2014 at 10:44
|
Dumb question time, folks. There are four mounting points (shock, swingarm, dogbone front and dogbone rear) but seems like there are bearings in just three of those points (6 bearings= 3x pairs). Where is there no bearings and why? The shock bottom? I have this job to do as well as the rest of my great 2014 tear-down. With the rear suspension unloaded, you can hop the rear wheel up and down about half an inch :/
|
Posted By: SPOOKY
Date Posted: 29 Apr 2014 at 14:31
|
No bearings on the bottom shock as there's a bush in the eyelet instead. Your quite right 6 bearings, two in each of the other points. I don't know what bearings you have to replace the originals with, whether Aprilia or after market ones but please don't use the Aprilia seals, they are sh*te with an extremely small lip, it's no wonder why so much water and crap get past them. LatersSPOOKY ------------- www.apriliaperformance.co.uk www.apriliaforum.co.uk www.apriliaownersclub.co.uk |
Posted By: apriliano
Date Posted: 29 Apr 2014 at 16:58
Thanks SPOOKY Top advice. I have ordered the bearings and seals from Simply Bearings. I decided to try their middle of the road offering as it seems fairly easy to stay on top of the maintenance.
|
Posted By: mona-toetje
Date Posted: 03 Mar 2017 at 18:38
| I installed the dogbone the other way around. So the wear is on the dogbone at the frame mount. Does it matter which way the dogbone is installed? |
Posted By: bladebod
Date Posted: 07 Mar 2017 at 15:14
| Thats a definite chunk of web gone missing there, needs checking.. |
Posted By: bladebod
Date Posted: 07 Mar 2017 at 15:15
I does look as though a chunk is missing - that needs investigating before riding the thing...
|
Posted By: 426hemi
Date Posted: 07 Mar 2017 at 16:07
This is a spare swingarm I have and the one on my bikes identical.
|
Posted By: IanG
Date Posted: 08 Mar 2017 at 08:19
|
I still have this to do on my Tuono but when I get round to doing it I intend fitting caged bearings not those half ar*ed full compliment ones and also grease nipples. One further mod will be decent garter seals fitted reversed so it allows grease out against the rubbing faces but keeps water out  Pity Aprilia never employed any engineers,but I suppose it kept the accountants happier ------------- www.apworkshops.co.uk www.apriliaforum.co.uk www.apriliaownersclub.co.uk Looking forward to the next track day |