

|
|
 FAQ FAQ    Register Register  Login Login
|
Got me bigbore kit now |
Post Reply 
|
Page <1234 15> |
| Author | ||
BrummyMax 
Moto GP Alien 
Joined: 11 Feb 2008 Status: Offline Points: 300 |
 Post Options Post Options
") Thanks(0) Thanks(0)
 Quote Reply Quote Reply
 Posted: 10 Sep 2013 at 02:18 Posted: 10 Sep 2013 at 02:18 |
|
|
If you need to borrow tools for the job, I have:
1) Broken cam tensioner that can be used to consistently tension the cam chains fully when measuring your opening and closing angles. This is important. 2) Cutoff 15mm spanner with socket welded to it for torquing the internal cylinder head stud nuts. Use this with a torque wrench at 90 degrees. 3) Welded small steel platform that bolts to side of cylinder head giving a solid stage for the magnetic base of the dial gauge. 4) Custom laser cut degree wheel for the rotax engine. This bolts nicely to the end of the crankshaft using the standard bolt. 5) Custom engine stand for the Rotax which removes loads of stress out of working on this engine. Can tilt the engine side to side as well as holding it at just the right height to work on. Has wheels too. 6) Piston ring grinder. 7) Modified front sprocket that can accept a breaker bar. This is perfect for turning the engine backwards and forwards while a degree wheel is on the end of the crankshaft. 8) Dial gauge with magnetic base. Are you going to check valve to piston clearances on the timed heads? Ive got a good tip for this if you want to do it. Are the piston ring endgaps preset? Small washers with a very slightly raised section are perfect for tightening down the slotted cam sprockets. You will also need longer bolts than standard to account for the washers. It is possible to dismantle the front head without splitting the cams and sprockets, so timing can be maintained once set, even if you need to go back in. With the rear head, you have to split at least one sprocket from its cam. You are welcome to borrow all/any of these tools if you cover postage or collect. I assume you have a crank locking bolt. Just remember to take your time with the timing, double check every measurement and also set the valve clearances before you start.  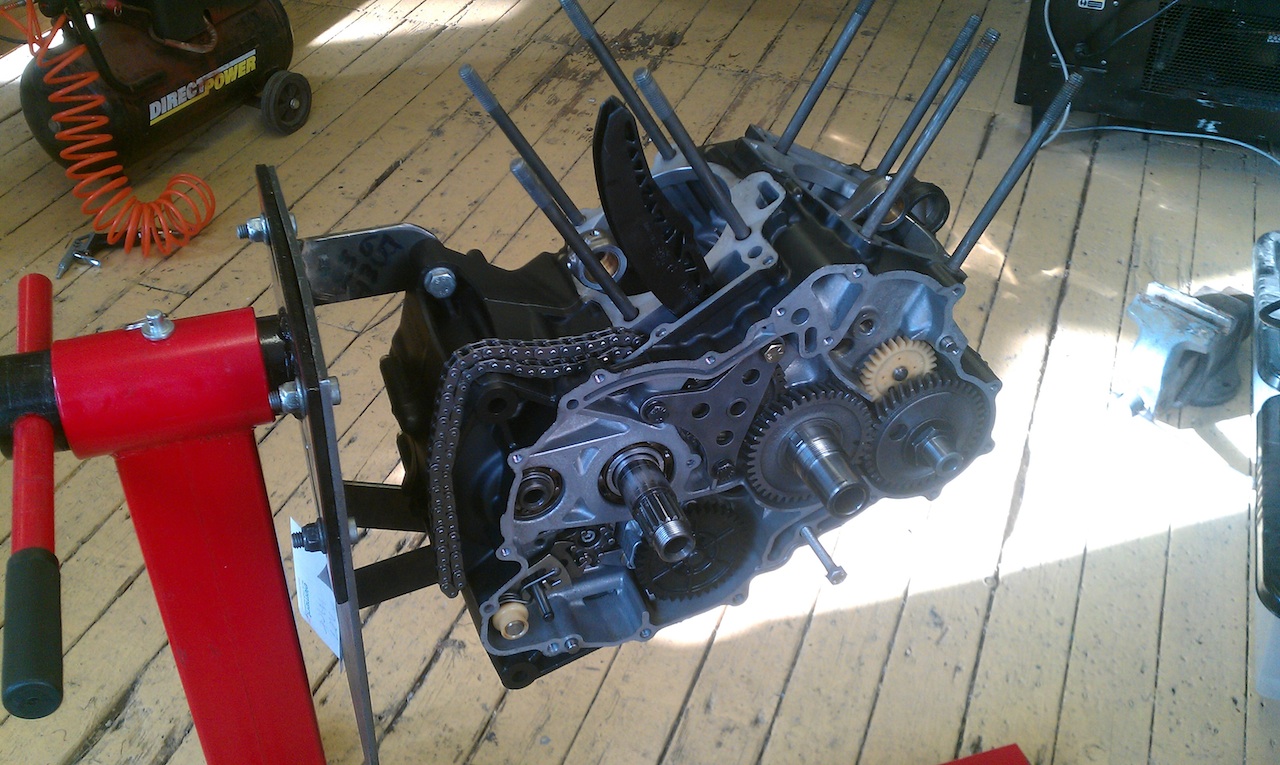    |
||
 |
||
|
redratbike
Moderator Group 
The Collector Messiah Joined: 07 May 2008 Status: Offline Points: 16331 |
Post Options
Thanks(0)
Quote Reply
Posted: 10 Sep 2013 at 06:15 |
|
|
Do you offer your services to build engines for people Max?as not all of us have the know how and/or space to do it in
|
||
 |
||
|
||
|
w00dzy
Premium Member Joined: 09 Dec 2012 Location: UK South Status: Offline Points: 1469 |
Post Options
Thanks(0)
Quote Reply
Posted: 10 Sep 2013 at 07:59 |
|
|
Good work and good question

|
||
|
||
|
tapmyhed
Premium Member 
Joined: 11 Feb 2008 Location: Suffolk Status: Offline Points: 1944 |
Post Options
Thanks(0)
Quote Reply
Posted: 10 Sep 2013 at 09:02 |
|
|
Thanks Brummy.
I'll hold onto your offer for now as waiting for some bits to arrive....so I cant proceed as yet. I have the bores off and pistons off, waiting for base gaskets, a parts cleaner to clean everything before putting it back on, and have crow feet spanners on order...similar to your tool. I'm working on a modified potting bench! Obviously strengthened a bit, but easy enough to slide the engine on. Very jealous of your engine stand. I do need a magnetic base, but I'll get the maint chaps at work to make me one. Worked out the front head disassembly...I did remove the cams as I wanted to see the state of the bearing faces....working with an unknown engine....tops usually go before bottoms with oil issues. Look good to me. Rear head I just removed the EX gear, left the timing side 110mm bolt in as the IN gear was in the way...did not want to disturb the balance timing for now. I've got a degree wheel but I'm going to put that on a modified allen bolt so I dont have to take the gen cover off....for now. I still need to see in there, check the sprag and the gen...eventually, but I dont want the engine split too apart for now. Whats a piston ring grinder and why do I need one????? Valve to head clearance......I reckon your tip is a strip of solder hot glued to the head??? Seen and read and digested previous posts! I'm not sure I'll do this as its my first time messing about with an engine like this I think if the thing goes together OK and the cam timing can be made spot on, then I'll most likely not look......I may reconsider after putting a few more hours into it...but taking the heads on and off I'm worried I'll bust the rings or something stupid.....not done it before. I had some manual tensioners made up generally to fit anyway....these are perfect for keeping the chain tight too....those will be staying in once the build is complete. You mentioned washers for the slotted gears....what washers are best to use, and what bolts? I'm assuming the bolts are not soft tinsel bolts, but something a bit better? Also, what cam timing do you think is best...I'm after all round general use, not racing or anything so not interested in peak power....more mid-range kinda guy. I'm planning on using 106/109, but have heard 110/110 is also something to consider. Do you use a PC5 with stock injectors? Part of this mod of mine will eventually go to big green injectors....not sure its worth the hassle, but I heard the 1103 puts the stock injectors towards the top of there range of operation....duty cycles over 85% tend to become less consistent...so moving to bigger injectors brings that down a little to optimum operating ranges.....as I understand it. I dont mind having more power, but good control has to be spot on for me as I like to have good control of the throttle, nice smooth feed ins and predictable wheel responses. I have to say, I didn't think removing the bores would be so easy. All in all its taken me about 3 hours to get both off, including the potting bench mod. I reckon I could do it way quicker now. Putting it back together may take some time as I'm anal about measurements, cleanliness etc. No point going to all that bother to just fukk it all up due to impatience. Heres a question for you, when torquing up the head nuts, I know its about 54NMs or something, do you tension to that that add an angle of turn? Or just torque it? Do you retorq after a running time? say after 100 miles? Just wondering whats best as the workshop manual doesn't say. Anyway, thanks for the offer so far, very much appreciated.
|
||
|
Factory 04
Big Bore Whore |
||
|
||
|
tapmyhed
Premium Member
Joined: 11 Feb 2008 Location: Suffolk Status: Offline Points: 1944 |
Post Options
Thanks(0)
Quote Reply
Posted: 10 Sep 2013 at 09:08 |
|
|
Brummy,
where are you? I'm guessing midlands??? Can you give me dimensions of the steel plate, hole distance size etc. Thanks.
|
||
|
Factory 04
Big Bore Whore |
||
|
||
|
BrummyMax
Moto GP Alien
Joined: 11 Feb 2008 Status: Offline Points: 300 |
Post Options
Thanks(0)
Quote Reply
Posted: 10 Sep 2013 at 21:18 |
|
|
It ain’t no bother disturbing the balance timing. Just line up the 2 dots on the helical gears and sorted again. This is with the crank locking tool at top dead centre of the rear cylinder. The crank locking tool should always be in place for the cylinder you are working on. You can see it on one of the photos above sticking out of the cases.
I’d remove the flywheel and sprag now. Its easier to get the timing wheel bolted down to the crank tightly that way. I think it would be flimsy if you attach one to a 14mm hexagon socket/bolt. There would be a bit of play between the crank and timing wheel. However you may improvise it well, so just preference really. Have you got the M22x1.5 flywheel removal tool? Locktite 648 and standard strength too? Crank locking pin? The end gap for piston rings is important. It needs to be tight enough to prevent too much blow by, but loose enough for the ring to expand with the heat of combustion. Forced induction and nitrous needs bigger gaps than naturally aspirated. It may be that the rings supplied with your pistons and matched, bored + plated barrels have already been gapped. The tool I use is basically a cordless dremmel with a grinding disc. This is bolted down to a piece of wood that has a metal stage either side of the grinding disc with a plastic ring guide. The guide ensures the rings are squarely pushed into the grinding disc from both ends. It is important to only grind from the outside to the inside of the ring. This is so the external ring coating does not chip away. Using the tool involves measuring the end gap of the ring with feeler gauges when it is square in the bore of the cylinder, then grinding a small amount. Backwards and forwards between bore and grinder until the desired end gap is reached. Small steps every time to prevent too large end gaps. The grinder apparatus ensures that you get a square and even grind to the fragile rings. I know some people have used files, but I think it is very difficult to get the ground edges to be square to each other. Once the end gap is achieved, very lightly hand file any burrs from the top, bottom and back edge. I use 0.45 mm compression end gap, 0.5 mm secondary ring end gap and 0.38mm oil ring end gap. Yes the solder strip is the best way to do the piston to valve clearance check. Washers are standard small steel ones that have a blob of weld on that has been ground into the correct shape and height to protrude over the internal edge of the sprockets so that they just sit on the camshaft raised edge. I tried using just the bolts, but they just tore up leaving little swarfs of metal, so I improvised with these washers and they work perfectly. I use 106/109 and I have not tried any other timing. I use a Motty for fuelling with a lamda in front and rear headers. I believe the PC5 can do a similar thing too, but the Motty’s data logging is useful for sorting problems. Im using gen 1 denso injectors. My bike is a mixture between the early and later bikes. Best bits of both in my opinion, except for the looks :) When torquing the stud nuts up, just use the spec torque with the tool coming off the end of the torque wrench at 90 degrees. Once it clicks, you’re done. One thing though. It is easier to have a friend help when dropping the cylinder and cylinder head down the studs over the installed pistons and rings. One controls the cylinder and the other pushes the rings into the cylinder skirts. I use the chunky grip end of a cable tie to push the ring into the ring lands while the cylinder skirt gently drops over the ring. Don't use a metal tool at all! Some people have used a cable tie to compresses the ring and the cylinder slides down and displaces the cable tie while the ring springs into the bore. This didn’t work for me as piston ring compressors didn’t. It is fiddly but you’ll get the knack. I actually really like this part of the process. Its like engine therapy :) Im based in central Nottingham. And pictures speak a thousand words .......... 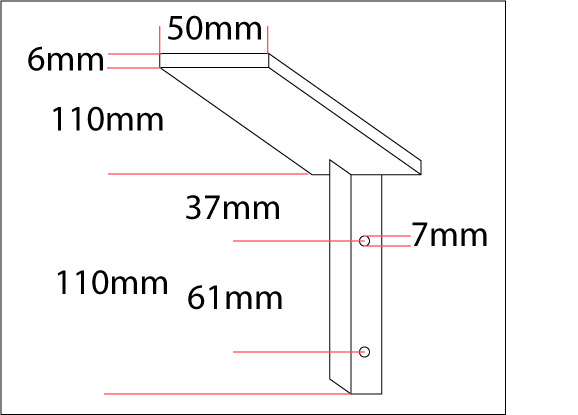  |
||
|
||
|
BrummyMax
Moto GP Alien
Joined: 11 Feb 2008 Status: Offline Points: 300 |
Post Options
Thanks(0)
Quote Reply
Posted: 10 Sep 2013 at 21:40 |
|
Yes, I will happily build up an engine for any of you. I built one last week that is now in a bike. |
||
|
||
|
BrummyMax
Moto GP Alien
Joined: 11 Feb 2008 Status: Offline Points: 300 |
Post Options
Thanks(0)
Quote Reply
Posted: 10 Sep 2013 at 22:07 |
|
|
Just found this link:
http://www.jepistons.com/PDFs/TechCorner/SCPDrawings/piston_instrc4032.pdf Also, make sure the piston wrist pin offset is correct on assembly! |
||
|
||
|
redratbike
Moderator Group
The Collector Messiah Joined: 07 May 2008 Status: Offline Points: 16331 |
Post Options
Thanks(0)
Quote Reply
Posted: 10 Sep 2013 at 22:32 |
|
|
||
|
|
||
|
||
|
tapmyhed
Premium Member
Joined: 11 Feb 2008 Location: Suffolk Status: Offline Points: 1944 |
Post Options
Thanks(0)
Quote Reply
Posted: 11 Sep 2013 at 14:37 |
|
|
My head hurts.....time for a breather.
Got all of that. Got a dremmel, so will do piston ring clearance...though, how do you measure it???? if its in the bore??? Got huge tiewraps for piston installation, had not considered using them before. When you run it in, what oil do you use and for how long?
|
||
|
Factory 04
Big Bore Whore |
||
|
||
|
tapmyhed
Premium Member
Joined: 11 Feb 2008 Location: Suffolk Status: Offline Points: 1944 |
Post Options
Thanks(0)
Quote Reply
Posted: 11 Sep 2013 at 14:39 |
|
|
OK, I got it now......put them in the bore without the piston......easy when you know how!
|
||
|
Factory 04
Big Bore Whore |
||
|
||
|
BrummyMax
Moto GP Alien
Joined: 11 Feb 2008 Status: Offline Points: 300 |
Post Options
Thanks(0)
Quote Reply
Posted: 11 Sep 2013 at 15:32 |
|
|
They are very flimsy in the bore so its easy to get a false feeler gauge measurement, especially with the oil scraper rings. Use the loose piston to push them into the bore squarely before end gap measurement. Always measure the rings when they are at a depth in the bore that they will pass during normal combustion. I like to measure at about an inch from the top of the cylinder.
Dont forget to get the correct staggering of the ring end gaps when installing the cylinders onto the pistons. You'll have to google for the best staggering cause I cant remember off the top of my head. I just use cheapo mineral oil for running in. I also drop it after the first 5 minutes idling to inspect its condition. Obviously, you keep a very good ear to an engine that is started the first time after a comprehensive build. Also drop it after 20 miles to check it again. They only need mineral for the first 5000 miles. I don't believe in babying the engine during its running in period either. None of this is gospel, its just my opinion. This is a very interesting read: http://www.mototuneusa.com/break_in_secrets.htm |
||
|
||
|
tapmyhed
Premium Member
Joined: 11 Feb 2008 Location: Suffolk Status: Offline Points: 1944 |
Post Options
Thanks(0)
Quote Reply
Posted: 11 Sep 2013 at 21:51 |
|
|
Ah I read that a while ago. What oil do you use for the running in period?
Thanks for your advice so far....stuff I would of missed may have caused issues later on. Top banana!!!
|
||
|
Factory 04
Big Bore Whore |
||
|
||
|
BrummyMax
Moto GP Alien
Joined: 11 Feb 2008 Status: Offline Points: 300 |
Post Options
Thanks(0)
Quote Reply
Posted: 11 Sep 2013 at 22:33 |
|
|
It was Halfords 10W40 mineral last time.
|
||
|
||
|
BrummyMax
Moto GP Alien
Joined: 11 Feb 2008 Status: Offline Points: 300 |
Post Options
Thanks(0)
Quote Reply
Posted: 12 Sep 2013 at 11:21 |
|
|
And another thing .......
Its worth lapping the valves in and getting the valve clearances sorted on the loose heads. Quite a nice job this one, at the kitchen table. Also, and this might be obvious: after working on one head at top dead centre, you need to rotate the crankshaft either 300 or 420 degrees to get the other cylinder at top dead centre before installing its cams etc. |
||
|
||
|
davidrsurfer
Premium Member 
Joined: 22 Feb 2011 Location: North Devon Status: Offline Points: 2535 |
Post Options
Thanks(0)
Quote Reply
Posted: 12 Sep 2013 at 13:23 |
|
& while you are there stick a polisher down the ports just to make sure they are nice & smoooooth. Not such an issue now but in the good old days they were rough as rats especially around the guide & seat inserts so you could take plenty of metal off those areas & flow them nice.
|
||
|
Motorcycle friendly self catering holiday apartment Acorn Studio. See us at Air bnb.
|
||
|
||
|
tapmyhed
Premium Member
Joined: 11 Feb 2008 Location: Suffolk Status: Offline Points: 1944 |
Post Options
Thanks(0)
Quote Reply
Posted: 12 Sep 2013 at 16:20 |
|
|
What I had considered as 'just a quick swap about'
 is turning into a whole mini project here!!! is turning into a whole mini project here!!!I'm planning on fitting engine for spring, with a trackday run in....... So I guess I have time to muddle on a bit at a time....and get it spot on....might as well....  Thanks for all the advice.
|
||
|
Factory 04
Big Bore Whore |
||
|
||
|
tapmyhed
Premium Member
Joined: 11 Feb 2008 Location: Suffolk Status: Offline Points: 1944 |
Post Options
Thanks(0)
Quote Reply
Posted: 15 Sep 2013 at 13:11 |
|
|
Temp stop for the moment.
No rush though? After some consideration, I might as well give valve lapping and port polishing a go too...so just waiting for a new bench to arrive before I carry on. Going to do some painting too. I've read a lot of stuff since postings/advice from Brummy. I have a new found respect for engine builders (Brummy, Fusebox and so on), as this stuff is complex for the newbee (me) and there is so much you can do in addition to just swapping bits about.......and so much you can really fluck up. So I've spent this weekend getting stuff in for cleanliness (plastic boxes), tools to do the job, and the last thing, a good solid bench to work on....I think I'm going to do some painting too as I want it to look immaculate once finished....so any ideas on colours? I've had red........so far, but one big red lump might be too fast for me.... ;-) Might as well do it right as I'm not one for being happy with a shoddy job. Once I'm ready to 'crack on', I'll start up a new post....but it is hoped to be in and running for next spring, and I'm going to do the unconventional run in too......thrash it from fully warmed, first run. Dont worry about shells and the like, thats all run in.....as is the g/box....this is to bed the rings in proper. :-) I do wonder what the dyno will say once completed?????
|
||
|
Factory 04
Big Bore Whore |
||
|
||
|
BrummyMax
Moto GP Alien
Joined: 11 Feb 2008 Status: Offline Points: 300 |
Post Options
Thanks(0)
Quote Reply
Posted: 15 Sep 2013 at 14:06 |
|
|
Thats a nice approach. You don't want to rush this. Take your time and enjoy it!
The gen 2 heads are well designed, so there are not that many gains to be be had, unless you go different valves, cams and valve seats. Dont polish the inlet's. The turbulence from a coarse surface keeps the intake charge nicely mixed, filling the cylinder more efficiently. You can tidy the ports up though. I did on mine. I cleaned up the casting marks and the valve guide bosses. |
||
|
||
|
Skullface
Premium Member 
Joined: 12 Jun 2012 Location: Wolverhampton Status: Offline Points: 729 |
Post Options
Thanks(0)
Quote Reply
Posted: 16 Sep 2013 at 12:32 |
|
|
i dont know if its easy to do on these, but I matched the exhaust manifolds to the heads with the porting tool too, there was a slight misalignment and a large lip to start with.
|
||
|
||
|
BrummyMax
Moto GP Alien
Joined: 11 Feb 2008 Status: Offline Points: 300 |
Post Options
Thanks(1)
Quote Reply
Posted: 16 Sep 2013 at 14:21 |
|
|
There needs to be a step from the exhaust port down to the exhaust header. If they are matched mid-range will definitely be reduced, especially if you use long duration cams.
There is a good book called "Four Stroke Engine Performance Tuning" by Graham Bell. Its packed with information and is where I got the above from. |
||
|
||
|
Skullface
Premium Member
Joined: 12 Jun 2012 Location: Wolverhampton Status: Offline Points: 729 |
Post Options
Thanks(0)
Quote Reply
Posted: 16 Sep 2013 at 14:51 |
|
|
I think we talking cross purpose because I wasnt clear, I dont mean the manifold and pipework should not step, I'm just talking about the mating faces of the two parts, casting lips and minor tolerance issues where they butt together, thats best smooth as possible so no turbulence on the exit of the head
|
||
|
||
|
BrummyMax
Moto GP Alien
Joined: 11 Feb 2008 Status: Offline Points: 300 |
Post Options
Thanks(0)
Quote Reply
Posted: 16 Sep 2013 at 15:31 |
|
|
Ah, ok. Its easy to get the wrong end of the stick when describing these things!
|
||
|
||
|
tapmyhed
Premium Member
Joined: 11 Feb 2008 Location: Suffolk Status: Offline Points: 1944 |
Post Options
Thanks(0)
Quote Reply
Posted: 17 Sep 2013 at 12:55 |
|
On order now...
 4th edition. Cant wait. 4th edition. Cant wait.  |
||
|
Factory 04
Big Bore Whore |
||
|
||
|
tapmyhed
Premium Member
Joined: 11 Feb 2008 Location: Suffolk Status: Offline Points: 1944 |
Post Options
Thanks(0)
Quote Reply
Posted: 14 Oct 2013 at 16:21 |
|
|
Got the book.....need another book to understand this one......
Nah, not really, but man, its full of stuff!  Been away for a while with work.....work just gets in the way.....but progress I shall. I should start a blog.....pictures and all that other stuff...video? LOL
|
||
|
Factory 04
Big Bore Whore |
||
|
||
|
IanG
Premium Member Joined: 04 Oct 2010 Location: N Wales Status: Offline Points: 10767 |
Post Options
Thanks(0)
Quote Reply
Posted: 14 Oct 2013 at 21:26 |
|
Actually Janspeed proved the opposite a good while back,they found a definite mismatch to be beneficial. They actually had a port sized spigot welded inside an oversized manifold tube so that there was an actual lip around the lower part of the port so restricting the gas reversion when the pulses went negative. As I recall it scavenged the cylinder better as it reduced the volume of exhaust gas contamination but still used the reverse wave efficiently. These trends come and go,it's a bit like the world beating crankcase breather thing that Harris produced that enabled the then Airwaves Duc's to dominate BSB. Not listed on their website anymore although Neeves put his long term Gixxer thou on their dyno and then went out on a roadtest and raved about the results in this vid http://youtu.be/Y017jVmLYi8 |
||
|
www.apworkshops.co.uk
www.apriliaforum.co.uk www.apriliaownersclub.co.uk Looking forward to the next track day |
||
|
||
|
tapmyhed
Premium Member
Joined: 11 Feb 2008 Location: Suffolk Status: Offline Points: 1944 |
Post Options
Thanks(0)
Quote Reply
Posted: 21 Oct 2013 at 07:48 |
|
|
I wonder if that was vacuum of the crankcase. Been readung that fat engine book, and got a bit more done this weekend. Sleeves cleaned and painted, looking good. Pistons cleaned too, read for rings now...this is going so slow, but now past the mental block, every job has one....
|
||
|
Factory 04
Big Bore Whore |
||
|
||
|
BrummyMax
Moto GP Alien
Joined: 11 Feb 2008 Status: Offline Points: 300 |
Post Options
Thanks(0)
Quote Reply
Posted: 21 Oct 2013 at 16:14 |
|
|
Yawn ....... you're such a big bore.
Any chance of pictures? Id love to see the pistons, rings, head gaskets and a closeup of the cylinder sleeve. How does the skirt height compare to stock pistons? How about the cylinder skirt cutaways compared to stock cylinder skirts? |
||
|
||
|
tapmyhed
Premium Member
Joined: 11 Feb 2008 Location: Suffolk Status: Offline Points: 1944 |
Post Options
Thanks(0)
Quote Reply
Posted: 21 Oct 2013 at 18:05 |
|
|
ill do my best once kids in bed...i guess your in on your own tonight??? nothing like a good bit of piston....;-)
|
||
|
Factory 04
Big Bore Whore |
||
|
||
|
BrummyMax
Moto GP Alien
Joined: 11 Feb 2008 Status: Offline Points: 300 |
Post Options
Thanks(0)
Quote Reply
Posted: 21 Oct 2013 at 18:30 |
|
|
Guilty pleasures with the curtains drawn ....
Actually, Im off to see a Gamelan orchestra and have a meal. £5 all in at a Malaysian restaurant. Not sure how good it'll be. If Im really lucky, I can come home to some nice closeup pictures of engine components |
||
|
||
|
Post Reply
|
Page <1234 15> |
 Tweet
Tweet
|
| Forum Jump | Forum Permissions You cannot post new topics in this forum You cannot reply to topics in this forum You cannot delete your posts in this forum You cannot edit your posts in this forum You cannot create polls in this forum You cannot vote in polls in this forum |


 Topic Options
 redratbike wrote: